GLOBUS CONNECT FILE TRANSFER
Globus augments in secure copy (scp/sftp) requests by automating reliable large data transfers, resuming interrupted transfers, encrypting transfers, and simplifying the implementation of high-performance transfers between computing centers.
The UNC Globus collection which provides access to various Research Computing storage areas is called “UNC, Research Computing, DataMover” (or uncch#unc-rc-dm). Storage areas accessible in this collection include: /work, /21dayscratch, home directories, /proj, /nas/depts, and other locations.
In addition, several departments, schools or labs manage more specialized collections. For example, the School of Medicine manages a number of collections for departments/labs within it.
Table of Contents
- Transferring data to/from a local workstation
- Transferring data between two UNC collections
- Transferring data between two remote collections
- Upload/download files to/from a collection
- Globus OneDrive collection
Globus Command Line Interface (CLI)
Globus
Globus Connect and Globus.org
- “Collections” are locations between which data can be transferred. They can be on laptops, high-performance research clusters, and anything in between.
- Globus Connect is a Software as a Service (SaaS) deployment of the Globus Toolkit which provides end-users with a web browser interface to initiate fast, reliable data transfers between collections registered with the Globus Alliance. Globus Connect allows registered users to transfer files from one collection to another.
- The servers at globus.org manage the transfer (negotiating, monitoring, optimizing). Data is transferred directly between collections and never seen by globus.org servers/networks.
- Due to its ease of use, Globus is recommended for individuals without extensive IT experience.
To learn more: https://www.globus.org
For information on account access and initial setup, we recommend reading Getting Started with Globus Connect.
Logging into Globus
To use Globus for file transfer, go to the web site https://www.globus.org and click the "Log in" button at the top right. Login with your UNC Onyen ID and password. From the Log in page, enter and select “University of North Carolina at Chapel Hill” as the CILogon method.
Details on logging in are available at Getting Started with Globus Connect.
Transferring data
Transferring data to/from a local workstation
You can use Globus to transfer data between your local workstation (e.g., your laptop or desktop) and Research Computing storage. In this workflow, you configure a Globus personal collection on your local workstation by installing the Globus Connect Personal (GCP) software.
Workflow summary
- Log in to Globus.org
- Setup a personal collection following Getting Started with Globus Connect - Globus Connect Personal. For more information about adding a Mac, Windows, or Linux personal collection, see the Globus.org FAQ.
- On the File Manager page, select the two-panel view in the top-right corner, then on one side select the personal collection that you made, and on the other side select the “UNC, Research Computing, DataMover” collection. You will be required to authenticate to the Research Computing collection using your Onyen account.
Workflow detail
The “UNC, Research Computing, DataMover” collection enforces encryption for all transfers. Other collections may allow a choice of whether or not to encrypt data during transfer. By default, “Transfer” copies files from the source to destination collection, overwriting files if they are already present at the destination. Under the “Transfer & Sync Options” dropdown menu at the center of the page (between the two Start buttons) are some options to customize the behavior of a transfer:
- Only transfer new or changed files where the checksum is different
- Delete files on destination that do not exist on source
- Preserve source file modification times
- Verify file integrity after transfer
- Encrypt transfer (enforced at UNC’s collection even if not selected by user)
To setup your own personal collection, use Globus Connect Personal. Details about this are found at Getting Started with Globus Connect - Globus Connect Personal.
In this example, on the left is the UNC, Research Computing, DataMover collection. On the right is a personal collection setup as described above on a local desktop.

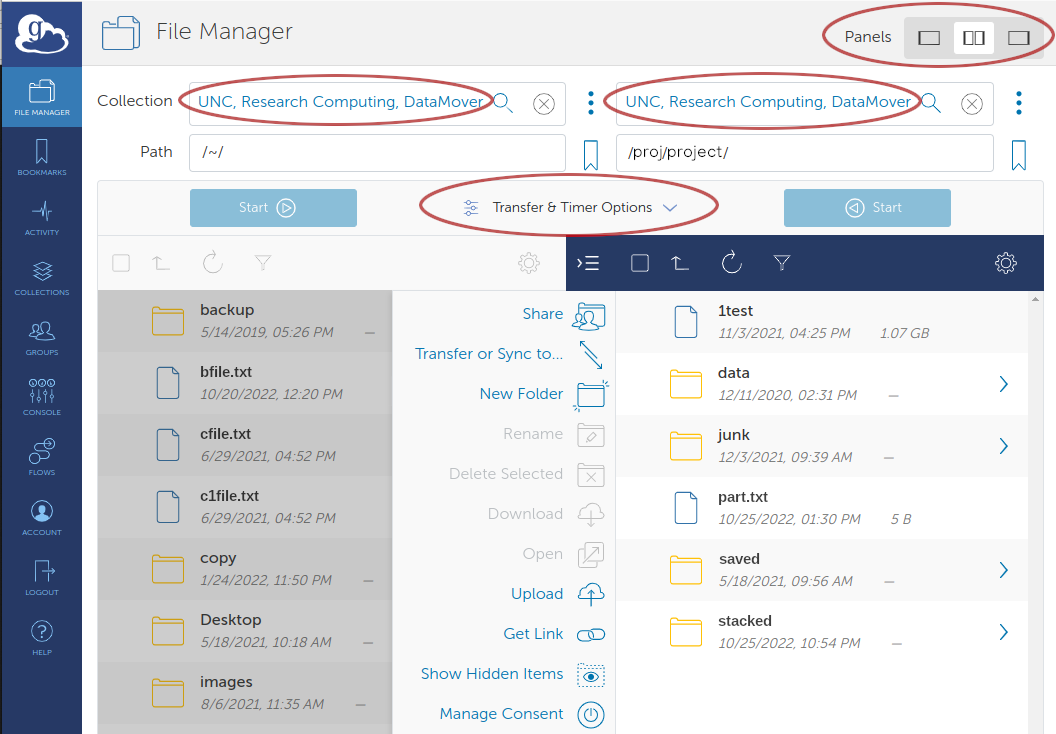
Transferring data between two UNC collections
Accessing the “UNC, Research Computing, DataMover” collection as source and destination allows you to transfer data between various Research Computing storage such as /proj, /pine, Mass Storage (~/ms/), and home directories. This method would be the same as using “ms” queue or a basic mv/cp task on the command-line on the research clusters. The benefit is fast, reliable file transfer, and resuming interrupted transfers. This UNC collection can also be used as either the source or destination to transfer data between UNC and external collaborators. Many universities and national labs have data accessible in Globus collections.
- Log in to Globus.org
- On the File Manager page select the 2-panel view in the top right corner. Then select the “UNC, Research Computing, DataMover” collection on one side, and either this collection again or another one on the other side, as needed for the source and destination of the transfer. You will be required to authenticate to the Research Computing collection using your Onyen account. The other collection may require its own authentication as well. All transfers to/from the “UNC, Research Computing, DataMover” collection are encrypted. By default, transfers copy files from one collection to the other, overwriting existing files if they are already present at the destination. Under the “Transfer & Sync Options” dropdown menu at the center of the page (between the two Start buttons) are some options to customize the behavior of a transfer:
- Only transfer new or changed files where the checksum is different
- Delete files on destination that do not exist on source
- Preserve source file modification times
- Verify file integrity after transfer
- Encrypt transfer (enforced at UNC’s collection even if not selected by user)
Transferring data between two remote collections
The transfer process shown above can be used to transfer data between any two Globus collections, including personal collections and other collections at UNC and other institutions.
Upload/download files to/from a collection
Certain smaller transfers between a local computer (laptop/desktop) and a Globus collection can be done using the Upload/Download buttons on the File Manager page when the collection is selected as described above. This only works for single files and there is a collection-dependent size limit on files that it works for. These limitations are due to the transfer being done by HTTPS.
Sharing Data Using Globus
To share data with internal or external collaborators using Globus, please see Sharing Files with Collaborators Using Globus.
Globus Command Line Interface (CLI)
Globus provides a command line interface (CLI) as an alternative to its web interface. The CLI is suited to both interactive and scripting use cases.
The Globus CLI is provided as a Python package from PyPI. It can be installed with pipx or pip. It is recommended to install it in its own Python environment.
Install the CLI package following the installation instructions.
Globus CLI commands start with
globus. To start a CLI session, the first command isglobus login. If you are using the CLI on a remote system without a web browser, use the--no-local-serveroption to generate a link to copy into a browser on your local system, follow the prompts to login there, then copy the resulting authorization code back to complete the login process in the CLI:$ globus login --no-local-server Please authenticate with Globus here: ------------------------------------ https://auth.globus.org/v2/oauth2/authorize?client_id=a90ef655-d82b-67e3-a7d0-42ccaad1baf2&redirect_uri=https%3A%2F%2 Fauth.globus.org%2Fv2%2Fweb%2Fauth-code&scope=openid+profile+email+urn%3Aglobus%3Aauth%3Ascope%3Aauth.globus.org%3Avi ew_identity_set+urn%3Aglobus%3Aauth%3Ascope%3Atransfer.api.globus.org%3Aall+urn%3Aglobus%3Aauth%3Ascope%3Agroups.api. globus.org%3Aall+urn%3Aglobus%3Aauth%3Ascope%3Asearch.api.globus.org%3Aall&state=_default&response_type=code&access_t ype=offline&prompt=login ------------------------------------ Enter the resulting Authorization Code here: stdG6Wdtk53G9iqFE46wsDDQe1jy4e You have successfully logged in to the Globus CLI! You can check your primary identity with globus whoami For information on which of your identities are in session use globus session show Logout of the Globus CLI with globus logout $The Globus CLI can be used to start and manage transfers, view and manage files in a collection, and other operations. Useful information to get started includes:
- Run the command:
globus --help - Run the command:
globus list-commands - See the CLI QuickStart Guide
- See the CLI reference
- Run the command:
When done using the CLI, you can logout with the command
globus logout.